
FixMyInflatable — inflatable repair training
CallGet Pricing

Inflatable Water Slide Repair: Seams, Surfaces & Blankets

Inflatable water-slide repair starts with one question: is the damage in the sewn inflatable body, the sliding surface, or the removable slide blanket? Those are different repairs. Seams are restitched, localized vinyl damage may be patched, and a worn blanket may need to be rebuilt completely. Water and friction make preparation especially important, so the unit must be clean and fully dry before repair work begins.
Inflatable water slide sliding surface being repaired

Why water slides wear differently

Constant water, body weight, and friction down the slide lane accelerate wear on the surface and stress the seams that channel water. Moisture also means you must dry units fully before repair and storage to prevent mildew and adhesive failure.

Body seam, sliding surface, or slide blanket?

Before you grab glue or thread, identify which part actually failed.

  • Sewn body or structural seam: The inflatable itself has a failed stitch line, split seam, or structural tear. This is a sewing repair.
  • Localized surface damage: A small cut or damaged spot is limited to one area of otherwise sound vinyl. Depending on the location and stress, it may be a patch repair.
  • Worn slide blanket: The removable wear surface is thinning, tearing repeatedly, or failing across the sliding path. Patching one spot may only move the next failure a few inches away. This is when rebuilding the blanket makes more sense.

Repairing or replacing the sliding surface

A small, isolated damaged spot on otherwise healthy material may be patchable. Broad wear is different. If the sliding path is thinning, tearing in multiple areas, or failing repeatedly, stop stacking patches and evaluate the blanket as a complete wear surface.

The question is not whether you can glue one more patch on it. The question is whether the surrounding material is still strong enough to support another rental cycle.

Slide blankets

Many commercial water slides use a removable slide blanket as the wear surface. When that blanket reaches the end of its useful condition, it can be rebuilt.

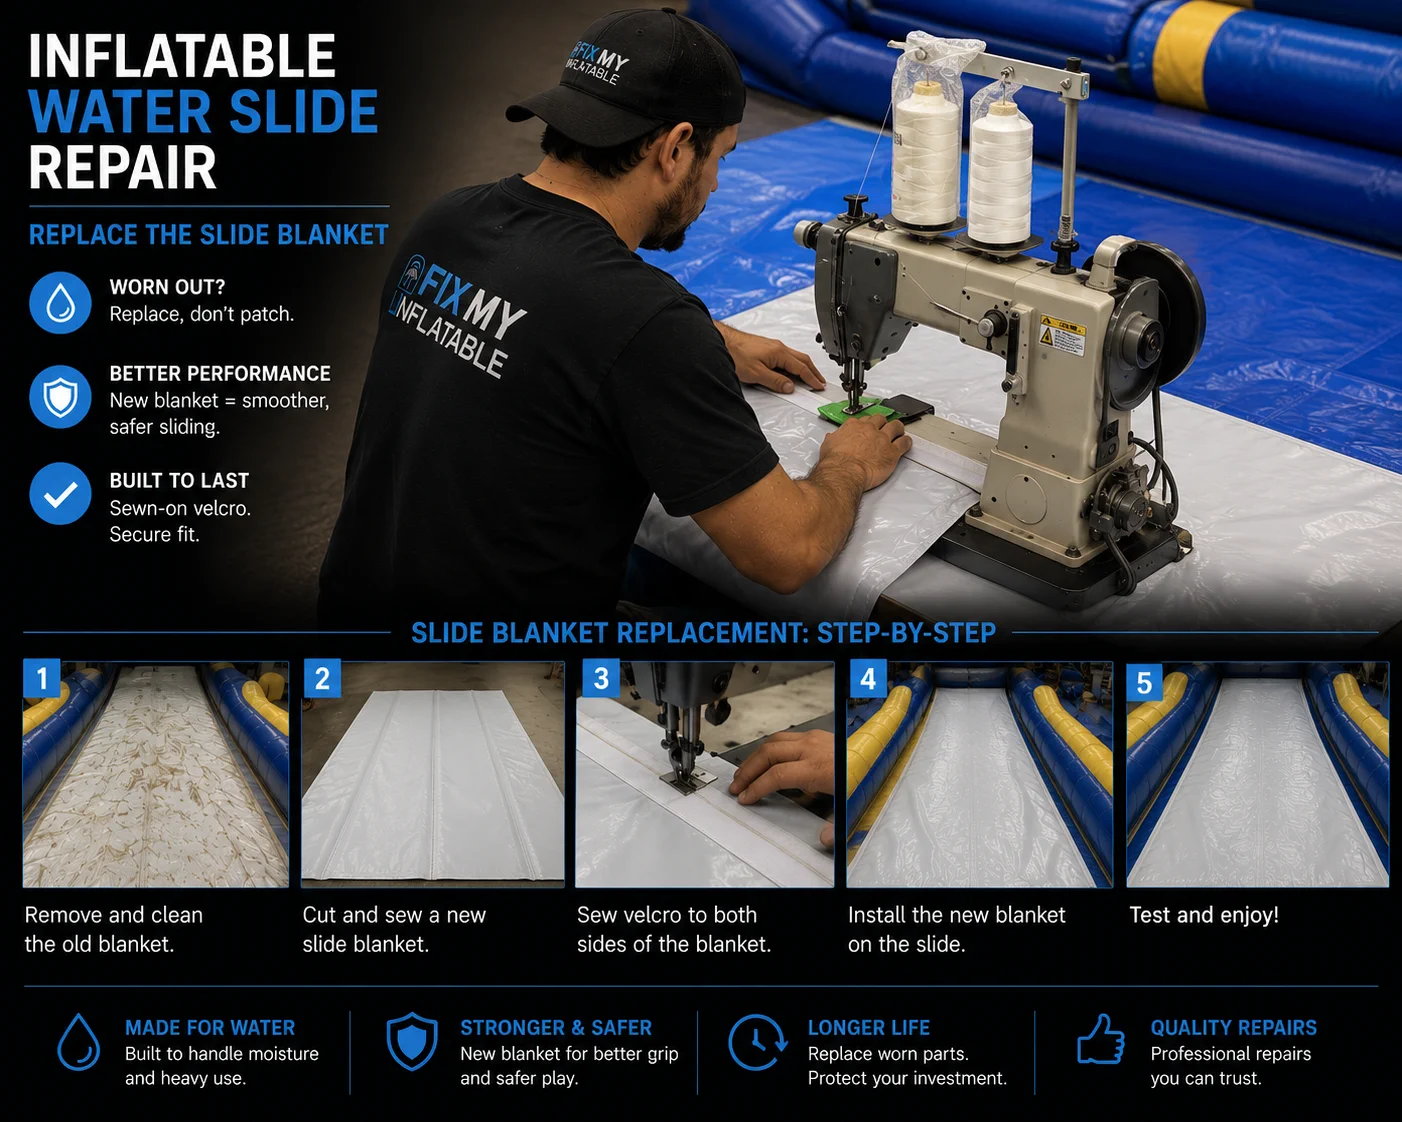
The old blanket is removed and used as a reference for size and shape when possible. New commercial vinyl is cut for the replacement. The Velcro is sewn onto the new blanket off the inflatable using the portable walking-foot machine. Once the new blanket is finished, it is attached to the matching Velcro on the slide.

The Velcro belongs underneath the installed blanket along the attachment area. It should not look like exposed black strips running down the top of a finished sliding surface.

Sewing is part of building the replacement blanket and attaching its Velcro. The machine does not sit on the inflatable while the blanket is being installed.

How to rebuild a worn slide blanket

  1. Step 1
    Remove the worn blanket

    Detach the existing blanket and inspect the attachment area on the slide. Confirm the mating Velcro and surrounding slide material are still suitable for the replacement.

  2. Step 2
    Use the old blanket as a reference

    Lay the old blanket out flat when possible and use its overall shape, attachment points, and orientation as a reference. Do not assume a rectangle will fit every slide.

  3. Step 3
    Cut the new blanket material

    Cut the replacement from suitable commercial vinyl, maintaining the correct shape and coverage for the sliding path.

  4. Step 4
    Sew the Velcro onto the new blanket

    Build the blanket at the portable walking-foot machine. Sew the Velcro to the underside or attachment edge of the new blanket so the finished attachment is hidden when installed.

  5. Step 5
    Install and align the blanket

    Attach the rebuilt blanket to the slide's mating Velcro, working evenly so the blanket lies smooth through the riding path.

  6. Step 6
    Run and inspect the slide

    Inflate the unit, run water, and inspect the blanket through the full sliding path. Look for bunching, misalignment, exposed attachment material, or edges that are lifting before the unit returns to rental service.

How to repair a water slide seam

Step-by-step restitch and reinforcement workflow for a failed water slide seam.

  1. Step 1
    Deflate and trace the full seam failure

    Deflate the slide and inspect the whole seam. A visible opening may be only part of the failure, so follow the stitch line beyond the obvious damage before you start.

  2. Step 2
    Clean and dry the repair area

    The vinyl needs to be clean and completely dry before you sew or bond anything. Remove dirt and residue and give wet material time to dry fully.

  3. Step 3
    Realign the original seam

    Bring the layers back into their original position and remove loose or failed thread that interferes with the repair. Follow the original construction instead of creating a new seam path through the panel.

  4. Step 4
    Restitch with a walking-foot machine

    Use a heavy-duty single-needle walking-foot machine and follow the original seam line. If the original construction used two rows, make a second controlled pass rather than treating a dedicated double-needle machine as a requirement for repair work.

  5. Step 5
    Reinforce the high-stress area when needed

    If the seam failed at a repeated stress point, add the appropriate reinforcement so the same load is not concentrated on the same weakened edge.

  6. Step 6
    Re-inflate and test under load

    Bring the slide back to full operating pressure, run water through the slide, and inspect the repaired seam for pulling, separation, or stitch failure before returning the unit to service.

Frequently asked questions

Can you patch a hole in a water slide?

A small, localized damaged area may be patchable if the surrounding material is still sound and the location is suitable for a patch. Broad wear on the sliding path or a blanket that is failing in multiple places is usually a replacement decision, not a patch decision.

How do you keep a repaired water-slide seam from failing again?

Follow the original seam path, restore the structural stitching with a walking-foot machine, and reinforce a repeated stress point when the surrounding construction calls for it. Then re-inflate and inspect the repair under normal operating pressure and load.

What's a slide blanket?

The slide blanket is the wear surface on many commercial inflatable slides. It takes the friction from riders and water instead of wearing directly through the inflatable body. When the blanket is worn out, it can often be rebuilt and replaced.

Is the replacement blanket sewn directly onto the inflatable?

The blanket is normally fabricated off the unit. The Velcro is sewn to the new blanket at the machine, and the finished blanket is attached to the slide afterward.

GET PRICING NOW

Learn every inflatable repair — hands-on class, online course, and the machine that makes it possible.